
The Northern District of California requires that all new civil cases be e-filed, except for cases that are filed by unrepresented (“pro se”) plaintiffs.
Chambers/Courtesy Copies
The Local Rules no longer require courtesy copies, although some judges require them in specific instances. Please review the assigned judge’s webpage for guidance.
Opening Cases
The Northern District of California requires that all new civil cases be e-filed, except for cases that are filed by unrepresented (“pro se”) plaintiffs. The court has prepared step-by-step training resources to assist attorney e-filers with the case opening process. There are three guides on this page:
Attorney Guide to E-filing New Civil Cases (Complaints / Notices of Removal)
This guide includes common e-filing information relevant to all the attorney case filings which includes adding party/attorney information, uploading documents, and submitting payment.
Note: Effective April 2025, the Northern District of California no longer requires a civil cover sheet for attorney case openings.
Attorney Guide to E-filing New Miscellaneous Cases
Effective December 2020, civil miscellaneous (MISC) cases filed by represented parties must be opened using the Attorney Miscellaneous Case Opening procedures in CM/ECF.
Attorney Guide to E-filing New Sealed Cases
Requests for sealing a partial complaint or to seal an entire case will follow the sealed docketing process. Once the case is assigned a Judge, the sealing request will be further reviewed by the Court.
Pro se litigants cannot open cases electronically. See The Court’s Pro Se Handbook for information on how to open a case.
NOTE: An application to proceed in the case anonymously or by pseudonym must be filed with your complaint when filing as a Doe/pseudonym plaintiff, or if your complaint includes Doe/pseudonym defendants.
Nearly all new civil cases must be opened (filed) electronically using the court's e-filing system, CM/ECF. Civil miscellaneous (MISC) cases filed by represented parties must be opened using the Attorney Miscellaneous Case Opening procedures in CM/ECF.
Manual filing of new case-opening documents is no longer available, except for cases brought by unrepresented ("pro se") litigants
Online case filing should not be used to reopen or transfer a case. These actions should be accomplished using the appropriate civil events in ECF within the existing case docket.
Sealed cases must be filed using a special ECF event. See instructions.
Please see the fee schedule summary page for current fee information.
Civil Local Rule 5-3 governs the filing of facsimiling copies of documents. The fax copy should not be transmitted directly to the clerk by electronic or telephonic means.
Information on the court's Legal Help Centers as well as forms, handbooks, filing instructions and other resources for individuals representing themselves in federal court is available at Representing Yourself in the United States District Court: Information for Pro Se Litigants.
People filing cases without an attorney should bring their papers for filing to the Clerk's Office. The Clerk's Office is open 9:00 a.m. to 4:00 p.m. Monday through Friday. To avoid lines, it is best to come in the mid-morning, during lunchtime, or 2:00 p.m. to 3:00 p.m.
If it is not possible to come to the Clerk's Office during regular business hours, it is possible to file papers using the drop boxes in the San Francisco, Oakland and San Jose courthouses. Access to the drop boxes is limited for the public by the hours during which the building is open. For complete drop box filing information, see Drop Box Filing Procedures.
This tutorial is meant as a guide to help you e-file. It is not an exhaustive list of events available to you. For a list of ECF events, you may review the tab Index of ECF Events, which is below on this page. For this tutorial, we will use a motion event.
You may access ECF through our website. Go to www.cand.uscourts.gov. Scroll down to the blue “Quick Links” box and click on “File a Case (CM/ECF)”. This will take you to our CM/ECF Information page. We suggest that you bookmark this page as it answers a lot of questions about your e-filing account and e-filing.
To access ECF, click on the CM ECF [NextGen] logo.
On this page, you will find a box to type in your PACER login name and password. You do not need to worry about the client code. Click login.
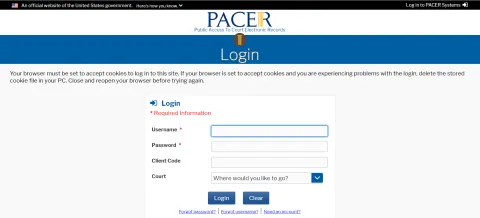
Now you are ready to start e-filing. You should see a white bar at the top with the tabs that say, Civil, Criminal, Query, Reports, Utilities, Search, Logout.

If you do not see the Civil and Criminal menu headings, contact the ECF Helpdesk at ecfhelpdesk@cand.uscourts.gov.
Next, you will select an ECF Event. You have two options on how to proceed.
Selecting Event Type – Option One:
Select Search to bring up the Search Bar.

Enter a keyword. A list of matching results will appear.
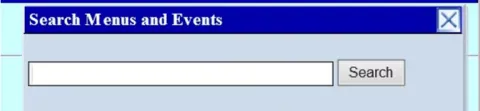
If you do not see what you are looking for, try a different keyword.
Selecting Event Type – Option Two:
Select Civil.
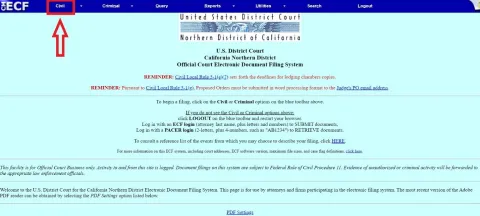
This will give you a list of the categories and subcategories available to you to e-file. For this example, we will be looking under the category “Motions and Related Filings,” and choosing “Motions – General.”
Select Motions - General.
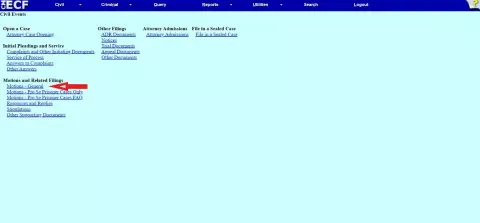
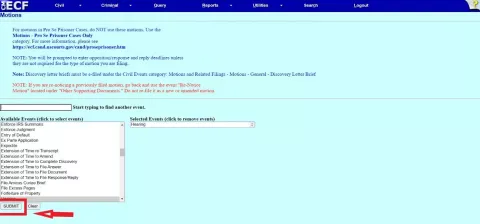
After you click on “Motions – General,” you will be taken to a page where you will select your event. You can either scroll through the alphabetical list of events, or start typing in the box titled Start typing to find an event field.
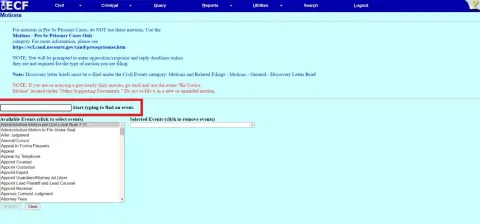
Once you see your event, click on it. This will populate the box that says Selected Events (click to remove events).
After Selecting Event Type:
Once you have selected your desired event, press the "submit" button.
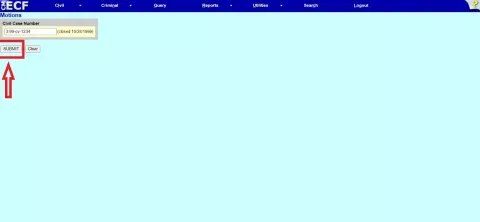
On the following page, if you are an attorney, you will be able to type in your case number. We suggest the format two-digit year, dash, and the last four digits of the case number. For example, case number 3:99-cv-1234, could be typed in as 99-1234.
If you are a pro se party, your case number should populate. If you have more than one case number, there will be a drop-down box listing all the cases you can e-file. Choose the case you wish to file in. Then hit submit.
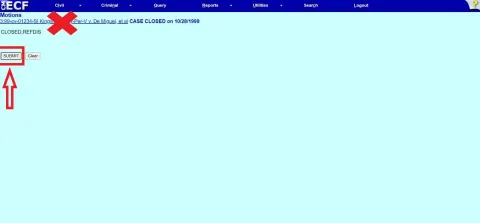
On the next page, you will see your case number hyperlinked in blue along with some acronyms. Do not click on the blue case number. If you do, the system will take you to PACER to view your docket sheet. Instead, click on the "submit" button.
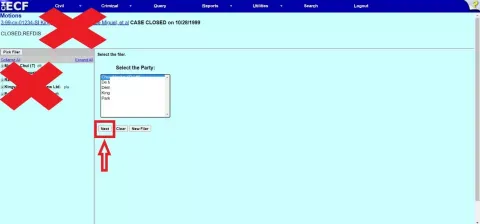
The next page will ask you to choose the party that is filing. If you are an attorney, you may click on the party that you represent. If you are a Pro Se, you will only have the option to choose yourself. Be sure to click on your name in the box on the right side titled, Select the Party. Do not click in the box on the left side of the screen
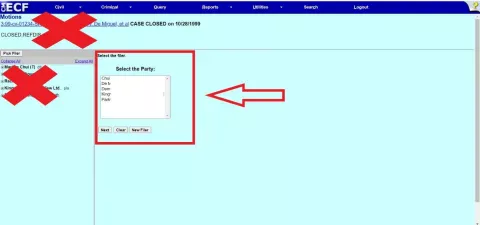
Once you have highlighted your name or your client, click on the "Next" button.
Now you are ready to upload your document. ECF only accepts PDF files. Be sure that your document is in PDF format and ready to be uploaded. The main document section must have a file, or you will not be able to move forward. Click on "Choose File" and find the file you wish to upload. If you are unsure how to find documents on your computer, you may search for the answer on the internet.
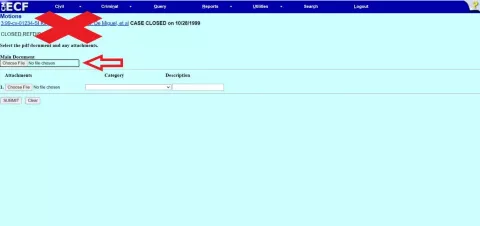
If you have multiple documents to upload, you will use the Attachments section. Click on Choose File and follow the steps for finding your document. Once your document is there, you will either choose the best category that matches your document in the drop-down box, or you can type in your own description in the text box. We suggest that no more than ten documents are uploaded per filing.

If you do not have more than one file, you may click on the "submit" button.
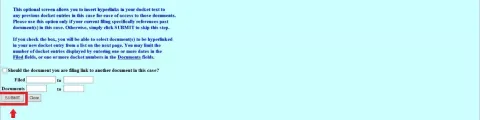
Some of the events allow you to link your entry to a previous entry in your case. If you wish to do so, and are presented with the screen, you may click the box that gives you the option to link your document.

If you choose the option to link your filing, the following screen will provide you a list of entries to which you may relate your current filing.
If you do not wish to link your filing, make sure the box is not checked. Click "submit."
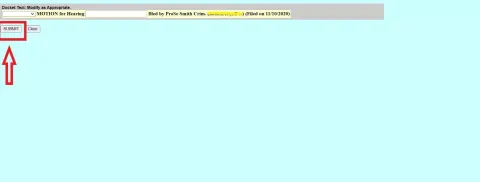
You are now on the second to final screen. This screen will allow you to add text to your docket entry. You may type what you wish in the text box and it will appear on the docket.
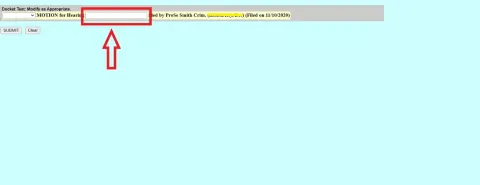
When you are done, or if you do not wish to add additional text, hit the "submit" button.
During this process, if you wish to start over, or you are unable to finish your filing, your document will not be uploaded into your case until you press the final "submit" button on the last page.
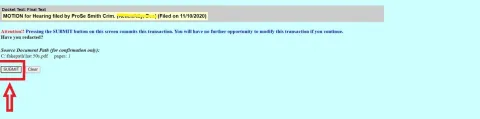
Once you have clicked this final "submit" button, your document and any additional text you may have added will be on the docket.
Uploading your documents in the correct order is key to successful e-filing. Here is how to do it.
1. The main document This is the first document to be uploaded (example: Motion to Dismiss). The document description is populated from the ECF event you have selected. Some events also offer a free text box to supplement this description. Additional text typed into the box will be added to the docket text for your filing.
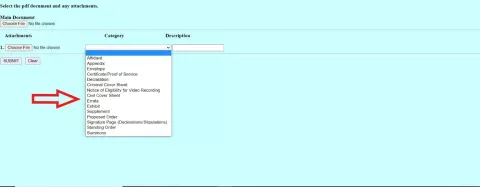
2. The attachments section Additional documents to your main document can be uploaded using the attachment section. Examples include declarations, exhibits and proposed orders.
3. Describe your attachments Use the category drop down menu and/or the description free text box to describe your attachments.
Category drop down menu. This menu contains commonly-used items such as "Proposed Order", "Exhibit", and "Declaration"; select the appropriate item.
Description text box. Further define your selection by entering text into this box. Example: after selecting "Declaration" in the drop-down menu, enter "of Jack Jones in Support of Motion to Dismiss" in the text box.
Different ways to use the attachment section
- Option 1: The category drop down menu and description free text box together.
- Option 2: Use the category drop down menu for some attachments and the description free text box for other attachments.
- Option 3: Only use the category drop down menu to enter descriptive information regarding your attachments.
- Option 4: Only use the description free text box to enter descriptive information.
Filing Under Seal
E-filing a confidential document under seal is permitted by Civil L.R. 79-5. To avoid unintentionally disclosing confidential information, read all instructions and our FAQ on this page before you begin. If you make an e-filing mistake, follow the instructions on the Correcting E-Filing Mistakes page.
INTRODUCTORY NOTES:
- If another party has previously designated the documents as confidential, follow the separate procedures outlined below.
- If you want a ruling on your motion to seal before filing the main document, submit the administrative motion at least two weeks before the filing deadline, and notify the judge’s courtroom deputy by email.
- In ECF, go to Civil → Motions:
- Select Administrative Motion to File Under Seal:
- Enter the case number and filer information.
- Upload your Administrative Motion as the main document and include as attachments a Declaration and a Proposed Order.
- No redacted version is required unless requested by the judge. If necessary, upload and label “Unredacted Version of [Document Name]" in the Description box.
- On the next screen, check the "Give any documents a sealed restriction" box.
- In the next step, you will be indicating that access should be restricted to the unredacted version of the document you seek to have sealed. You may also restrict access to the declaration if it is impossible to avoid specific reference to the confidential information therein. All other documents should remain unchecked and will be viewable by the public.
- Complete the e-filing. The motion, declaration, proposed order, and redacted version (if any) will be viewable by the public, but the unredacted version and (if appropriate, the declaration) will be marked “Restricted” on the docket and will not be viewable by the public or the filer.
- Email the Proposed Order to the Judge’s Proposed Order email address, available on each judge’s webpage. Links to each judge’s webpage.
- File redacted copies of the documents separately using the regular ECF event (e.g., motion, response) after e-filing the Administrative Motion. For supporting documents you have sought to be filed entirely under seal (e.g., an exhibit to a motion), file a placeholder.
- Manually serve non-ECF users (per Civil L.R. 5-1(h)(2)). Note that ECF users are automatically served but won’t have ECF access to sealed documents.
What to do When the Court Rules on the Administrative Motion
If your administrative motion is GRANTED in its entirety, the unredacted document remains under seal, and only the redacted version (if any) will be publicly accessible.
If your Administrative Motion is DENIED in its entirety, or GRANTED/DENIED IN PART, the Court will alert you whether it will consider the information sought for sealing if filed publicly, permit its withdrawal without considering the information, or otherwise direct your next step.
When the document was designated confidential by another party, you must additionally:
• Identify in your declaration which portions have been designated confidential, and the party who so designated.
• Serve the declaration on the designating party the same day it's filed.
• File a proof of service.
The designating party has 7 days to file a statement or declaration; failure to do so may result in the unsealing of the document.
Local Criminal Rule 56-1 permits sealed documents to be e-filed in existing criminal cases using the instructions on this page. Sealed documents submitted under these instructions will not be viewable by the public, attorneys, or parties. You, the filer, will not be able to review or access your document once it has been submitted under these instructions.
NOTE: Failure to follow the below procedures may result in documents being accessible to the public.
STEP I: E-Filing the Administrative Motion to File Under Seal
Both prosecutors and defense attorneys must follow these instructions to ensure that sealed documents are properly restricted from public view. Failure to follow these instructions could result in documents being available on the public docket. NOTE: This is not the procedure to use for documents related to (1) investigatory tools, (2) new case openings, or (3) cases/dockets that are entirely under seal.
1. In ECF, select Criminal → Motions
2. Select Administrative Motion to File Under Seal
3. Enter the case number and select the appropriate defendant(s)
4. When prompted, upload your documents in the following order:
- As the Main Document, upload the Administrative Motion to File Under Seal
- As an Attachment, upload the Supporting Declaration (use the pull-down menu to select "Declaration")
- As an Attachment, upload the Proposed Order (use the pull-down menu to select "Proposed Order")
- As an Attachment, upload the document(s) to be filed under seal. Use the pull-down menu to select a description (e.g., "Exhibit") or use the description box to name your document (e.g., "Medical Report")
5. Bypass the hearing prompt. No hearing is required.
6. The Notice of Electronic Filing (NEF) page completes your filing. Your entry is now sealed on the docket and will not be accessible by the public, attorneys, or parties. You will not be able to review or access your ECF entry once it has been submitted to the docket.
STEP II: What To Do after the Court Rules on the Administrative Motion
If your Administrative Motion is GRANTED in its entirety, the sealed and unredacted version of the document will remain under seal. NOTE: the presiding judge may also order that a redacted version be filed on the public docket. If the judge orders that a redacted version be filed, you will be notified by the Courtroom Deputy, and will need to follow up by e-filing a redacted version of the document.
If your Administrative Motion is DENIED in its entirety, the document sought to be sealed will not be considered by the Court unless the Submitting Party files an unredacted version of the document within 7 days after the motion is denied. See Criminal Local Rule 56-1(d)(2).
If your Administrative Motion is GRANTED in part and DENIED in part, the document sought to be sealed will not be considered by the Court unless the Submitting Party files a redacted version of the document which comports with the Court’s order within 7 days after the motion is denied. See Criminal Local Rule 56-1(d)(2).
When the Administrative Motion is filed, the attached documents are considered filed. However, file the motion early to allow the court enough time to review it.
You can’t. ECF does not permit the public to view under seal documents. If the judge requires a chambers copy, submit your unredacted versions without ECF headers.
Use Civil → Motions and Related Filings → Other Supporting Documents → Attachments to Administrative Motion to File Under Seal to upload additional documents securely.
CM/ECF Events
What is an ECF event?
You have prepared to submit a document to the court in the form of a Notice, Motion, Stipulation, etc.
To e-file that document, you will have to select an "event" from the available menus in ECF. You may not necessarily find an event that exactly matches the caption on your filing and there are some similar-sounding events in ECF, so it is important to plan ahead so that you select the correct event when you are e-filing your document(s).
We recommend that you review the Index of ECF Events on this website when preparing your filing. This will enable you to consider all the possibilities and make the right choice when you are not under time pressure.
How to find your event in ECF
In ECF, you may either use the search feature or navigate the civil or criminal menus:
Search Feature.
Clicking on the Search Feature will open a text box. Searching for events works best when you search for the least uncommon word in your event name (i.e. telephone instead of motion).
ECF TIP: Once you receive your results, begin your e-filing process by clicking on the hyperlink.
Navigate the Civil or Criminal Menus.
Each menu includes respective e-filing categories. These categories contain events listed alphabetically that matches or is similar to the document title you would like to submit to the court. Once you have located your event, begin your e-filing process.
Note About Hearing Dates:
Motions marked * on these lists will not prompt you to set a hearing date.
Motions for Pro Se Prisoner will not prompt you to set a hearing date.
Civil Events
- Initial Pleadings and Service
- Complaints and Other Initiating Documents
- Amended Complaint
- Amended Notice of Removal
- Amended Petition
- Application for Stay of Execution
- Application for Writ of Garnishment
- Bankruptcy Appeal
- Case Transferred in - District Transfer
- Case Transferred in - Divisional Transfer
- Complaint
- Counterclaim
- Crossclaim
- Intervenor Complaint
- Motion to Vacate/Set Aside/Correct Sentence (2255)
- Notice of Condemnation
- Notice of Removal
- Notice to Take Foreign Deposition
- Petition
- Petition for Writ of Habeas Corpus
- Petition for Writ of Mandamus
- Petition to Compel Arbitration Petition to Enforce IRS Summons
- Petition to Perpetuate Testimony
- Petition to Vacate Arbitration Award
- Registration of Foreign Judgment
- Student Loan
- Third Party Complaint
- Withdrawal of Reference
- Service of Process
- Acknowledgment of Service
- Affidavit of Service
- Certificate/Proof of Service Request for Waiver of Service
- Service by Publication
- Summons Returned Executed
- Summons Returned Executed as to USA
- Summons Returned Executed as to USA FOIA
- Summons Returned Executed in Social Security Cases
- Summons Returned Unexecuted
- Waiver of Service Executed
- Writ of Habeas Corpus ad Prosequendum Executed
- Writ of Habeas Corpus ad Prosequendum Unexecuted
- Writ of Habeas Corpus ad Testificandum Executed
- Writ of Habeas Corpus ad Testificandum Unexecuted
- Other Answers
- Affidavit in Opposition
- Affidavit in Support
- Amended Answer to Complaint
- Answer to Amended Complaint
- Answer to Complaint for Forfeiture
- Answer to CounterClaim
- Answer to CrossClaim
- Answer to Removal Complaint
- Answer to Third Party Complaint
- Answer to Writ of Garnishment
- Claim
- Objection to Report and Recommendation
- Response
- Response to Order to Show Cause
- Traverse
- Withdrawal of Claim
- Complaints and Other Initiating Documents
- Motions and Related Filings
- Motions — General
- Administrative Motion per Civil Local Rule 7-11
- Administrative Motion to File Under Seal *
- Alter Judgment
- Amend/Correct
- Appeal In Forma Pauperis *
- Appear *
- Appear by Telephone *
- Appoint Counsel *
- Appoint Custodian *
- Appoint Expert
- Appoint Guardian/Attorney Ad Litem *
- Appoint Lead Plaintiff and Lead Counsel
- Appoint Receiver
- Approve Consent Judgment *
- Attorney Fees
- Bifurcate
- Bill of Particulars
- Bond
- Certificate of Appealability *
- Certify Class
- Change Venue
- Compel
- Confirm Arbitration Award
- Consolidate cases
- Continue *
- Declaration of Mistrial
- Declaratory Judgment
- Default Judgment by the Clerk
- Default Judgment by the Court
- Deposit Funds
- Directed Verdict
- Disbursement of Funds
- Disclosure
- Discovery
- Discovery Letter Brief
- Dismiss
- Dismiss/Lack of Jurisdiction
- Dismiss/Lack of Prosecution
- Disqualify Counsel
- Disqualify Judge
- Disqualify Juror
- Enforce IRS Summons
- Enforce Judgment
- Entry of Default *
- Ex Parte Application *
- Expedite *
- Extension of Time re Transcript *
- Extension of Time to Amend *
- Extension of Time to Complete Discovery *
- Extension of Time to File Answer *
- Extension of Time to File Document *
- Extension of Time to File Response/Reply *
- File Amicus Curiae Brief
- File Excess Pages *
- Forfeiture of Property
- Hearing *
- In Limine
- Intervene
- Joinder *
- Judgment Debtor Exam
- Judgment NOV
- Judgment as a Matter of Law
- Judgment of Forfeiture
- Judgment on Partial Findings
- Judgment on the Pleadings
- Judgment under Rule 54b
- Leave to Appeal
- Leave to File Document *
- Letters Rogatory *
- Lift Stay
- Limited Admission
- Miscellaneous Relief
- More Definite Statement
- New Trial
- Order of Sale
- Partial Summary Judgment
- Permanent Injunction
- Permission for Electronic Case Filing
- Preliminary Injunction
- Pro Hac Vice *
- Proceed In Forma Pauperis *
- Produce
- Protective Order
- Quash
- Quash (Under Seal) *
- Reassign Case
- Reconsideration *
- Recusal
- Redact Transcript *
- Relate Case *
- Release of Bond Obligation
- Release of Funds
- Remand
- Remove Incorrectly Filed Document *
- Reopen Case *
- Return of Property
- Review of Taxation of Costs
- Sanctions
- Seal Case *
- Service by Publication *
- Set Aside
- Set Aside Default
- Set Aside Forfeiture
- Set Aside Judgment
- Set Aside Verdict
- Settlement
- Sever
- Shorten Time *
- Show Cause
- Stay
- Strike
- Substitute Attorney *
- Substitute Party
- Summary Judgment
- Suppress
- Take Deposition
- Temporary Restraining Order *
- Transfer Case
- Unseal Case *
- Unseal Document *
- Vacate
- Warrant in rem *
- Withdraw
- Withdraw Reference
- Withdraw as Attorney
- Writ
- Writ of Garnishment
- Writ of Habeas Corpus ad prosequendum *
- Writ of Habeas Corpus ad testificandum *
- Writ of Mandamus
- Motions for Pro Se Prisoner Cases
- Administrative Motion to File Under Seal PSP
- Alter Judgment PSP
- Amend/Correct PSP
- Appear PSP
- Appear by Telephone PSP
- Appoint Counsel PSP
- Appoint Custodian PSP
- Appoint Expert PSP
- Appoint Guardian/Attorney ad Litem PSP
- Appoint Lead Plaintiff and Lead Counsel PSP
- Appoint Receiver PSP
- Approve Consent Judgment PSP
- Attorney Fees PSP
- Bifurcate PSP
- Bill of Particulars PSP
- Bond PSP
- Certificate of Appealability PSP
- Certify Class PSP
- Change Venue PSP
- Compel PSP
- Confirm Arbitration Award PSP
- Consolidate Cases PSP
- Continue PSP
- Declaration of Mistrial PSP
- Declaratory Judgment PSP
- Default Entry PSP
- Default Judgment PSP
- Deposit Funds PSP
- Directed Verdict PSP
- Disbursement of Funds PSP
- Disclosure PSP
- Discovery PSP
- Dismiss PSP
- Dismiss/Lack of Jurisdiction PSP
- Dismiss/Lack of Prosecution PSP
- Disqualify Counsel PSP
- Disqualify Judge PSP
- Disqualify Juror PSP
- Enforce IRS Summons PSP
- Enforce Judgment PSP
- Ex Parte Application PSP
- Expedite PSP
- Extension of Time re Transcript PSP
- Extension of Time to Amend PSP
- Extension of Time to Complete Discovery PSP
- Extension of Time to File Answer PSP
- Extension of Time to File Document PSP
- Extension of Time to File Response/Reply PSP
- File Amicus Curiae Brie PSP
- File Excess Pages PSP
- Forfeiture of Property PSP
- Hearing PSP
- In Limine PSP
- Installment Payment Order PSP
- Intervene PSP
- Joinder PSP
- Judgment Debtor Exam PSP
- Judgment NOV PSP
- Judgment as a Matter of Law PSP
- Judgment of Forfeiture PSP
- Judgment of Partial Findings PSP
- Judgment on the Pleadings PSP
- Judgment under Rule 54(b) PSP
- Leave to Appeal PSP
- Leave to File Document PSP
- Letters Rogatory PSP
- Limited Admission PSP
- Miscellaneous Relief PSP
- More Definite Statement PSP
- New Trial PSP
- Order of Sale PSP
- Partial Summary Judgment PSP
- Permanent Injunction PSP
- Preliminary Injunction PSP
- Pro Hac Vice PSP
- Proceed In Forma Pauperis PSP
- Produce PSP
- Protective Order PSP
- Quash (Under Seal) PSP
- Quash PSP
- Reassign Case PSP
- Reconsideration PSP
- Recusal PSP
- Redact Transcript PSP
- Relate Case PSP
- Release of Bond Obligation PSP
- Release of Funds PSP
- Remand PSP
- Remove Incorrectly Filed Document PSP
- Reopen Case PSP
- Return of Property PSP
- Review of Taxation of Costs PSP
- Sanctions PSP
- Seal Case PSP
- Service by Publication PSP
- Set Aside Default PSP
- Set Aside Forfeiture PSP
- Set Aside Judgment PSP
- Set Aside PSP
- Set Aside Verdict PSP
- Settlement PSP
- Sever PSP
- Shorten Time PSP
- Show Cause PSP
- Stay PSP
- Strike PSP
- Substitute Attorney PSP
- Substitute Party PSP
- Summary Judgment PSP
- Suppress PSP
- Take Deposition PSP
- Temporary Restraining Order PSP
- Transfer Case PSP
- Unseal Case PSP
- Unseal Document PSP
- Vacate PSP
- Warrant in rem PSP
- Withdraw PSP
- Withdraw Reference PSP
- Withdraw as Attorney PSP
- Writ PSP
- Writ of Garnishment PSP
- Writ of Habeas Corpus ad prosequendum PSP
- Writ of Habeas Corpus as testificandum PSP
- Writ of Mandamus PSP
- Responses and Replies
- Opposition/Response to Motion
- Reply to Opposition/Response
- Stipulations
- Stipulation and Proposed Order
- Stipulation and Proposed Order selecting Early Neutral Evaluation
- Stipulation and Proposed Order selecting Mediation
- Stipulation and Proposed Order selecting Private ADR
- Stipulation without Proposed Order
- Other Supporting Documents
- Affidavit in Opposition to Motion
- Affidavit in Support of Motion
- Appendix
- Attachments to an Administrative Motion to File Under Seal
- Brief
- Correction of Opposition/Response or Reply Deadlines
- Declaration in Opposition
- Declaration in Support
- Exhibits
- Letter Brief
- Re-Notice of Motion
- Request for Judicial Notice
- Statement of Non-Opposition
- Statement of Recent Decision
- Supplemental Brief
- Motions — General
- Other Filings
- ADR Documents
- ADR Certification (ADR L.R. 3-5 b) of discussion of ADR options
- Notice of Need for ADR Phone Conference (ADR L.R. 3-5 d)
- Notice of Need for Mediation - ADA Cases Only
- Request for Trial De Novo (ADR L.R. 4-12)
- Notices
- Certificate of Counsel
- Certificate of Interested Entities
- Notice (Other)
- Notice of Acceptance with Offer of Judgment
- Notice of Application for Writ
- Notice of Change in Counsel Notice of Change of Address
- Notice of Intent to Request Redaction of Transcript
- Notice of Lis Pendens
- Notice of Motion/Stipulation Filed in MDL Master Case
- Notice of Opposition/Reply Filed in MDL Master Case
- Notice of Pendency of Other Action Involving Same Patent
- Notice of Substitution of Counsel
- Notice of Voluntary Dismissal
- Notice of Withdrawal of Motion
- Trial Documents
- Agreement for Jury Verdict
- Exhibit List
- Pretrial Conference Statement
- Proposed Findings of Fact
- Proposed Form of Verdict
- Proposed Jury Instructions
- Proposed Voir Dire
- Trial Brief
- Witness List
- Appeal Documents
- Amended Notice of Appeal
- Appellants Brief
- Appellants Reply Brief
- Appellees Brief
- Civil Appeals Docketing Statement
- Designation of Record on Appeal
- Notice of Appeal
- Notice of Appeal to Federal Circuit
- Notice of Cross Appeal to Ninth Circuit
- Notice of Cross Appeal to the Federal Circuit
- Transcript Designation Form
- Other Documents
- Affidavit
- Amended Document (NOT Motion)
- Amicus Curiae Appearance
- Application for Refund
- Application for Writ
- Association of Counsel
- Audio Recordings of Court Proceedings
- Bill of Costs
- Case Management Statement
- Consent/Declination to Proceed before a US Magistrate Judge
- Document E-Filed Under Seal
- Errata
- Financial Affidavit
- Financial Affidavit - CJA 23
- Interpleader
- Joinder
- Joint Case Management Statement
- Jury Demand
- Letter
- New Case Filing Fee
- New Habeas Case Filing Fee
- Notice of Intent to Request Redaction
- Objection
- Objections to Answer to Writ
- Pretrial Memorandum
- Proposed Abstract of Judgment Proposed Order
- Proposed Pretrial Order
- Proposed Summons
- Proposed Warrant
- Redacted Document
- Redaction Request - Transcript
- Report of Rule 26f Planning Meeting
- Response (Non Motion)Response to Order to Show Cause
- SSA Administrative Transcript Satisfaction of Judgment
- Special Maters Order
- Statement
- Status Report
- Suggestion of Bankruptcy
- Suggestion of Death
- Transcript Order
- Transcript Order - CJA
- Transcript Order - Future Trial with Daily Transcripts
- Attorney Admissions
- Application for Refund for Petition for Bar Membership
- Petition for Bar Membership
- Petition for Bar Membership (Corrected/Resubmitted)
- ADR Documents
Criminal Events
- Motions and Related Filings
- Motions
- Acquittal
- Alter Judgment
- Amend/Correct
- Appeal In Forma Pauperis *
- Appear *
- Appoint Counsel
- Appoint Expert
- Bifurcate
- Bill of Particulars
- Bond
- Brady Materials
- Certificate of Appealability *
- Change Venue
- Compel
- Consolidate cases
- Continue *
- Declaration of Mistrial
- Directed Verdict
- Disclosure
- Discovery
- Dismiss
- Dismiss/Lack of Jurisdiction
- Dismiss/Speedy Trial
- Disqualify Counsel
- Disqualify Judge
- Disqualify Juror
- Early Termination of Probation
- Enforce IRS Summons
- Ex Parte Application *
- Exclude
- Expedite
- Extension of Time re Transcript *
- Extension of Time to File Document *
- Extension of Time to File Response/Reply *
- Extension of Time to Indict
- File Amicus Brief
- File Excess Pages *
- Forfeiture of Property
- Handwriting Exemplars
- Hearing *
- In Limine
- Inspect
- Issuance of Warrant in rem
- Issue Summons
- Joinder *
- Judgment NOV
- Judicial Recommendation Against Deportation
- Leave to Appeal
- Leave to File Document *
- Medical Exam
- Medical Treatment
- Miscellaneous Relief
- Modify Conditions of Release
- New Trial
- Order of Competency to Stand Trial
- Pro Hac Vice *
- Produce
- Protective Order
- Psychiatric Exam
- Psychiatric Treatment
- Quash
- Quash Indictment/Information
- Reconsideration *
- Recusal
- Redact Transcript *
- Reduce Sentence
- Reduce Sentence - USSC Amendment
- Release from Custody
- Release from Bond Obligation
- Release of Funds
- Remand
- Remove Incorrectly Filed Document *
- Return of Property/PostTrial
- Return of Property/PreTrial
- Return of Surety
- Revoke
- Sanctions
- Seal
- Seal Case *
- Seal Document
- Separate Trial on Counts
- Service by Publication *
- Set Aside Forfeiture
- Set Aside Judgment
- Set Aside Sentence
- Set Aside Verdict
- Sever Defendant
- Show Cause
- Show Cause re: Reovcation of Probation
- Show Cause re: Reovcation of Supervised Release
- Special Appearance
- Speedy Trial
- Strike
- Substitute Attorney
- Suppress
- Take Deposition
- Travel
- Unseal Case *
- Unseal Document *
- Vacate
- Vacate (2255)
- Waiver
- Warrant
- Warrant for Arrest of Property
- Withdraw Document
- Withdraw Plea of Guilty
- Withdraw Plea of Nolo Contendere
- Withdraw as Attorney
- Writ
- Writ of Habeas Corpus ad prosequendum *
- Writ of Habeas Corpus ad testificandum *
- Stipulations
- Stipulation and Proposed Order
- Stipulation and Proposed Order to Reduce Sentence - USSC Amendment
- Stipulation without Proposed Order
- Responses and Replies
- Affidavit in Opposition to Motion
- Affidavit in Support of Motion
- Memorandum in Opposition
- Reply to Response
- Response to Motion
- Other Supporting Documents
- Declaration in Opposition
- Declaration in Support
- Exhibits
- Memorandum
- Memorandum In Opposition
- Re-Notice motion
- Request for Judicial Notice
- Motions
- Other Filings
- Detention
- Arrest
- Arrest - Other District
- Arrest of Material Witness
- Bond
- Detainer Lodged
- Temporary Commitment
- Discovery Documents
- Demand for Alibi Witness
- Demand for Public Authority Witness
- Notice of Alibi
- Notice of Error or Defect
- Notice of Insanity Defense
- Notice of Insanity Witness
- Notice of Intent to Use Evidence
- Notice of Issue of Foreign Law
- Notice of Public Authority Defense
- Notice of Public Authority Opposition Witness
- Withdrawal of Alibi
- Withdrawal of Defense
- Withdrawal of Insanity Witness
- Withdrawal of Public Authority Defense
- Waivers
- Waiver (Other)
- Waiver of Counsel
- Waiver of Interstate Agreement on Detainers
- Waiver of Minimum Time to Trial
- Waiver of Preliminary Examination or Hearing
- Waiver of Presence at Arraignment
- Waiver of Presentence Investigation Report
- Waiver of Rule 32.1 Hearings
- Waiver of Rule 40 Hearings
- Waiver of Rule 5 Hearings
- Waiver of Speedy Trial
- Waiver of Trial by Jury
- Service of Process
- Application for Writ of Habeas Corpus ad Prosequendum
- Application for Writ of Habeas Corpus ad Testificandum
- Certificate of Service
- Judgment Returned Executed
- Search Warrant Returned Executed
- Search Warrant Returned Unexecuted
- Summons Returned Executed
- Writ of Habeas Corpus ad Prosequendum Unexecuted
- Writ of Habeas Corpus ad Testificandum Executed
- Writ of Habeas Corpus ad Testificandum Unexecuted
- Notices
- Deferral of Prosecution
- Nolle Prosequi
- Notice (Other)
- Notice of Attorney Appearance - Defendant
- Notice of Attorney Appearance - USA
- Notice of Intent to Request Redaction of Transcript Notice of Related Case
- Notice of Substitution of Attorney
- Trial Documents
- Exhibit
- Pretrial Conference Statement Proposed Jury Instructions
- Proposed Voir Dire
- Request for Special Findings of Fact
- Trial Brief
- Trial Memorandum
- Witness List
- Appeal Documents
- Appeal of Magistrate Judge Decision to District Court - Criminal Case
- Appeal of MJ Decision to District Court- Magistrate Judge Case
- Defendant Brief
- Defendant Reply Brief
- Designation of Record on Appeal
- Government Brief
- Government Reply Brief
- Notice of Appeal
- Notice of Docketing Appeal from Magistrate Judge Decision
- Transcript Designation Form
- Other Documents
- Affidavit
- Affidavit - Rule 40
- Affidavit - Rule 5 (An Arrest from Another District)
- Application for Refund
- Assertion of Fifth and Sixth Amendment Rights
- Audio Recordings of Court Proceedings
- Consent to Inspection of PSI
- Consent to Proceed before US Magistrate Judge
- Certificate of Good Standing
- Consent to Trial before US Magistrate Judge
- Information to Establish Prior Conviction
- Letter
- Mail Returned
- Notice of Intent to Request Redaction
- Objection
- Objection to Presentence Investigation Report
- Objection to Report and Recommendations
- Pretrial Memorandum
- Proposed Order
- Redacted Document
- Redaction Request - Transcript
- Refusal of Magistrate Judge Jurisdiction
- Response
- Response to Order to Show Cause
- Sentencing Memorandum
- Statement
- Status Report
- Transcript Order
- Transcript Order - CJA
- Transcript Order - Future Trial with Daily Transcripts
- Withdrawal of Motion
- Detention
Reports and Utilities
- Reports
- Civil Reports
- Criminal Reports
- Civil and Criminal Reports
- Utilities
- Your Account
- FRC
- Miscellaneous
- Legal Research
- Verify a Document
- System Administrator Reports
The Court accepts online credit card payments from registered ECF users for certain e-filing events, for which fees are charged.
Which events have fees payable via Pay.gov?
- Attorney admission (Petition for Bar Membership);
- Pro hac vice admission fee in civil and criminal cases (Motion for Pro Hac Vice);
- Proof of membership in the bar of this court (Request for Certificate of Good Standing);
- Notice of appeal (civil and criminal cases);
- Opening a new civil case (Attorney Case Opening);
- Digital audio files of selected court hearings (Audio Recordings of Court Proceedings)
How do I use Pay.gov to pay fees online?
When e-filing a document that requires a fee, you will be automatically directed to the Pay.Gov online payment process. Once you have successfully completed your online payment, you will automatically return to ECF to complete your filing.
On the Pay.gov page, you will be presented with a payment information screen:
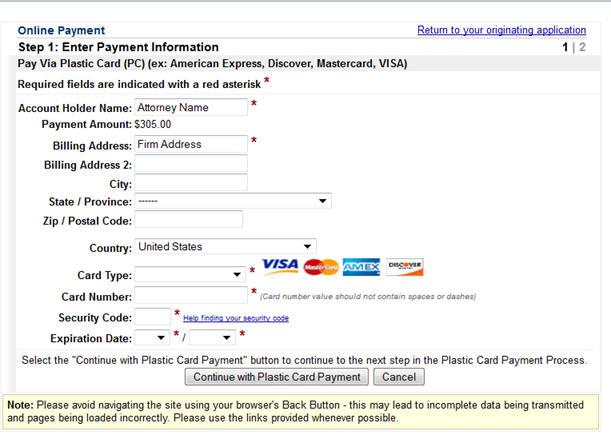
- Fields marked with an asterisk are required fields.
- The "account holder name" is the name on the credit card.
- The billing address is a required field that is pre-populated with the e-filer's ECF account information (which can be found in the ECF menu under Utilities→Maintain Your ECF Account) but may be changed. The address does not have to correspond to with the credit card billing address. Changing the billing address does not change your address in ECF.
- The payment amount field will be automatically filled in with the fee amount.
Clicking Continue with Plastic Card Payment presents you with a summary screen:
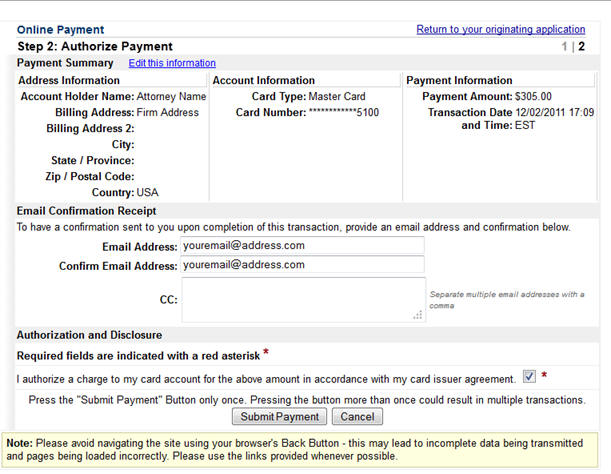
To receive a receipt for payment of the filing fee, you must enter a valid email address on this screen. Your email receipt will have a Pay.Gov tracking ID number and Agency Tracking ID/receipt that the Court will need to identify the transaction should a problem arise or a refund be requested.
Review the payment information to ensure that it is correct, then check the authorization box and click the "Submit Payment" button. You will be prompted with the following notice:
** WARNING**
Pressing the "Submit Payment" button more than once may result in multiple transactions being processed.
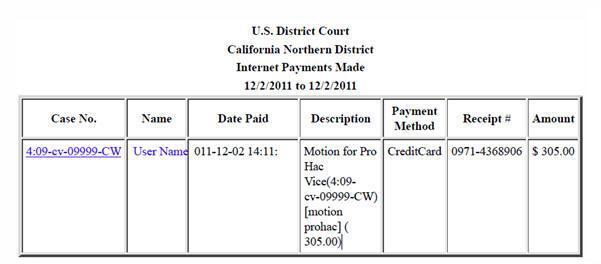
After Pay.gov has processed the transaction, the Transaction Summary will be displayed:

You will also receive an email with the same information.
Once your transaction has gone through, you will automatically return to ECF to complete your filing.
How do I view my Pay.gov transaction history?
Online payments of fees using Pay.gov may be reviewed by going to the Utilities Menu in ECF
and choosing Internet Payment History.
What do I do if I have a problem with an online payment?
- If a payment does not go through, an error screen will appear. PRINT THIS ERROR SCREEN or write down the complete message and email it to the ECFHelpDesk or call 1-866-638-7829 between 9:00 a.m. and 4:00 p.m. Monday through Friday.
- If you are concerned that your payment did not go through, view your Internet Payment History. If the payment does not appear in your Internet Payment History, it was not successful.
- If there is a technical failure with the payment module, the filing session must be restarted from the beginning.
- Pay.gov has occasional planned maintenance and upgrade outages; please visit the Pay.gov website for notice of planned outages and to sign up for email notification of them if desired.
How and when can I obtain a refund?
Refund requests are governed by General Order 68.
Step 1: Fill out the Pay.gov Application for Refund form.
Step 2: E-file the form using either:
Other Filings → Other Documents → Application for Refund
Attorney Admissions → Application for Refund for Petition for Bar Membership*
* Only use this for a Petition for Bar Membership.
It usually takes 7 business days for the Finance Unit to process your refund. For information on the status of your refund, please contact the Finance Unit.